前言
之前已经介绍过ONNX和ONNX Runtime,本文通过实例介绍它们的使用方法。本文将使用到的程序库及版本(其它版本也可兼容)为:
1
2
3
4
5
6
|
Python 3.8.5
PyTorch 1.10.1
torchvision 0.11.2
onnx 1.11.0
onnxruntime 1.11.0
opencv-python 4.5.5.62
|
如果电脑有GPU,使用onnxruntime-gpu将获得更高的计算性能。
Scikit-learn to ONNX
使用sklearn-onnx可以把scikit-learn模型转化为ONNX,首先安装sklearn-onnx
1
2
|
!pip install -U scikit-learn
!pip install skl2onnx
|
使用随机森林训练一个分类iris数据的模型
1
2
3
4
5
6
7
8
9
|
# Train a model.
from sklearn.datasets import load_iris
from sklearn.model_selection import train_test_split
from sklearn.ensemble import RandomForestClassifier
iris = load_iris()
X, y = iris.data, iris.target
X_train, X_test, y_train, y_test = train_test_split(X, y)
clr = RandomForestClassifier()
clr.fit(X_train, y_train)
|
转换scikit-learn模型为onnx模型,并保存为rf_iris.onnx:
1
2
3
4
5
6
7
|
# Convert into ONNX format
from skl2onnx import convert_sklearn
from skl2onnx.common.data_types import FloatTensorType
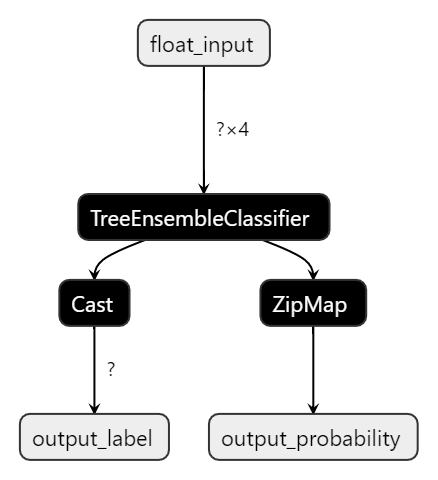
initial_type = [('float_input', FloatTensorType([None, 4]))]
onx = convert_sklearn(clr, initial_types=initial_type)
with open("rf_iris.onnx", "wb") as f:
f.write(onx.SerializeToString())
|
可以使用Netron查看模型结构,如下图
得到ONNX模型后,就可以使用ONNX Runtime进行推理,此时程序已经不再依赖scikit-learn库。
1
2
3
4
5
6
7
|
# Compute the prediction with ONNX Runtime
import onnxruntime as rt
import numpy
sess = rt.InferenceSession("rf_iris.onnx")
input_name = sess.get_inputs()[0].name
label_name = sess.get_outputs()[0].name
pred_onx = sess.run([label_name], {input_name: X_test.astype(numpy.float32)})[0]
|
对比scikit-learn和ONNX Runtime运行的结果,可以看到它们的推理结果一致。
1
2
3
4
5
|
pred_sk = clr.predict(X_test)
print('scikit-learn prediction:', pred_sk)
print('onnx runtime prediction:', pred_onx)

print('pred_sk == pred_onx?:', pred_sk == pred_onx)
|
1
2
3
4
5
6
|
scikit-learn prediction: [2 0 0 1 1 1 0 2 2 1 0 0 2 1 1 2 1 0 0 2 0 0 1 0 2 1 1 2 2 0 1 1 0 2 0 0 2 1]
onnx runtime prediction: [2 0 0 1 1 1 0 2 2 1 0 0 2 1 1 2 1 0 0 2 0 0 1 0 2 1 1 2 2 0 1 1 0 2 0 0 2 1]
pred_sk == pred_onx?: [ True  True  True  True  True  True  True  True  True  True  True  True
                        True  True  True  True  True  True  True  True  True  True  True  True
                        True  True  True  True  True  True  True  True  True  True  True  True
                        True  True]
|
PyTorch to ONNX
使用PyTorch自带的torch.onnx模块可以把PyTorch模型转换为ONNX模型。首先导出PyTorch Hub的ResNet-50模型,并转换为ONNX模型。
1
2
3
4
5
6
7
|
import torch

model_torch = torch.hub.load('pytorch/vision:v0.10.0', 'resnet50', pretrained=True)
model_torch.eval()
dummy_input = torch.randn(1, 3, 224, 224)
# torch.onnx.export(model_torch, dummy_input, "resnet50.onnx", verbose=True)\
torch.onnx.export(model_torch, dummy_input, "resnet50_torch.onnx")
|
使用ONNX加载并验证ONNX模型文件是否正确,然后打印模型的结果信息。
 1
 2
 3
 4
 5
 6
 7
 8
 9
10
|
import onnx

# Load the ONNX model
model_onnx = onnx.load("resnet50_torch.onnx")

# Check that the model is well formed
onnx.checker.check_model(model_onnx)

# Print a human readable representation of the graph
# print(onnx.helper.printable_graph(model_onnx.graph))
|
然后分别使用PyTorch和ONNX Runtime进行推理,可以看到两种执行方式所得到的TOP-5分类结果是一致的。
 1
 2
 3
 4
 5
 6
 7
 8
 9
10
11
12
13
14
15
16
17
18
19
20
21
22
|
from PIL import Image
from torchvision import transforms

# 准备数据
filename = 'assets/dog.jpg'
input_image = Image.open(filename)
preprocess = transforms.Compose([
    transforms.Resize(256),
    transforms.CenterCrop(224),
    transforms.ToTensor(),
    transforms.Normalize(mean=[0.485, 0.456, 0.406], std=[0.229, 0.224, 0.225]),
])
input_tensor = preprocess(input_image)
input_batch = input_tensor.unsqueeze(0)

# PyTorch推理
with torch.no_grad():
    output = model_torch(input_batch)

probabilities = torch.nn.functional.softmax(output[0], dim=0)
top5_prob, top5_catid = torch.topk(probabilities, 5)
print("PyTorch inference result: ", top5_catid, top5_prob)
|
1
|
PyTorch inference result: tensor([258, 259, 270, 261, 248]) tensor([0.8733, 0.0303, 0.0197, 0.0111, 0.0092])
|
 1
 2
 3
 4
 5
 6
 7
 8
 9
10
11
12
13
14
15
16
17
18
|
import numpy as np
from scipy.special import softmax

input_batch_np = input_batch.numpy()

import onnxruntime as ort

ort_session = ort.InferenceSession("resnet50_torch.onnx")

outputs = ort_session.run(
    None,
    { "input.1": input_batch_np },
)

probabilities = softmax(outputs[0])[0]
top5_catid = np.argsort(-probabilities)[:5]
top5_prob = probabilities[top5_catid]
print("ONNX Runtime inference result: ", top5_catid, top5_prob)
|
1
|
ONNX Runtime inference result: [258 259 270 261 248] [0.8732967 0.03027085 0.01967113 0.01107353 0.00920425]
|
TensorFlow (Keras) to ONNX
使用tf2onnx可以把TensorFlow、TensorFlow Lite和Keras模型转化为ONNX模型。首先安装tf2onnx
1
|
!pip install -U tf2onnx
|
下载预训练ResNet-50模型,然后转化为ONNX模型。
 1
 2
 3
 4
 5
 6
 7
 8
 9
10
11
12
13
|
import os
import tensorflow as tf
from tensorflow.keras.applications.resnet50 import ResNet50
from tensorflow.keras.preprocessing import image
from tensorflow.keras.applications.resnet50 import preprocess_input, decode_predictions
import tf2onnx

model_tf = ResNet50(weights='imagenet')
spec = (tf.TensorSpec((None, 224, 224, 3), tf.float32, name="input"),)
output_path = model_tf.name + "_tf.onnx"

model_proto, _ = tf2onnx.convert.from_keras(model_tf, input_signature=spec, opset=13, output_path=output_path)
output_names = [n.name for n in model_proto.graph.output]
|
另外tfonnx也支持通过命令行转换模型
1
2
3
|
model_tf.save(os.path.join(model_tf.name))

!python -m tf2onnx.convert --saved-model resnet50 --output model_tf2.onnx
|
然后分别使用TensorFlow和ONNX Runtime进行推理,可以看到两种执行方式所得到的TOP-5分类结果是一致的。
 1
 2
 3
 4
 5
 6
 7
 8
 9
10
11
12
13
14
15
16
|
img_path = 'assets/dog.jpg'

img = image.load_img(img_path, target_size=(224, 224))

x = image.img_to_array(img)
x = np.expand_dims(x, axis=0)
x = preprocess_input(x)

preds = model_tf.predict(x)
print('Keras Predicted:', decode_predictions(preds, top=5)[0])

providers = ['CPUExecutionProvider']
m = rt.InferenceSession(output_path, providers=providers)
onnx_pred = m.run(output_names, {"input": x})

print('ONNX Predicted:', decode_predictions(onnx_pred[0], top=5)[0])
|
1
2
|
Keras Predicted: [('n02111889', 'Samoyed', 0.9477502), ('n02114548', 'white_wolf', 0.022208065), ('n02111500', 'Great_Pyrenees', 0.00989518), ('n02112018', 'Pomeranian', 0.0060505737), ('n02120079', 'Arctic_fox', 0.003846892)]
ONNX Predicted: [('n02111889', 'Samoyed', 0.94775075), ('n02114548', 'white_wolf', 0.022208016), ('n02111500', 'Great_Pyrenees', 0.009895195), ('n02112018', 'Pomeranian', 0.0060506575), ('n02120079', 'Arctic_fox', 0.0038468903)]
|
PyTorch to TensorFlow
前面已经完成了PyTorch的转换,这里再演示把PyTorch转换的ONNX模型再次转换为TensorFlow模型,首先需要安装onnx-tf。
1
2
|
!pip install onnx-tf
!pip install tensorflow-probability
|
1
2
3
4
5
6
7
|
import onnx

from onnx_tf.backend import prepare

onnx_model = onnx.load("resnet50_torch.onnx")  # load onnx model
tf_rep = prepare(onnx_model)  # prepare tf representation
tf_rep.export_graph("resnet50_torch_tf")  # export the model
|
也可以使用命令行模式转换:
1
|
!onnx-tf convert -i resnet50_torch.onnx -o resnet50_torch_tf2
|
执行完后,就可以得到TensorFlow模型文件。
参考
- https://onnxruntime.ai/docs/get-started/
- https://github.com/onnx/onnx-tensorflow